Explore the ultimate guide for roblox shirt testing in 2024 for aspiring designers and experienced creators alike. Learning how to properly test your custom clothing items before uploading them to the marketplace is a vital step in the creation process. This article covers everything from utilizing free testing games to leveraging Roblox Studio for advanced previews. Discover why testing is the secret to high-selling items and how you can avoid common mistakes like misaligned seams or pixelated textures. We delve into the best tools available for creators today to ensure every outfit looks stunning on R6 and R15 models. Whether you are a hobbyist or a professional designer, mastering the art of the preview will save you time and Robux while boosting your reputation in the community.
This guide is the ultimate living FAQ for roblox shirt testing, updated for the latest 2024 patches and platform changes.Beginner Questions
What is roblox shirt testing?
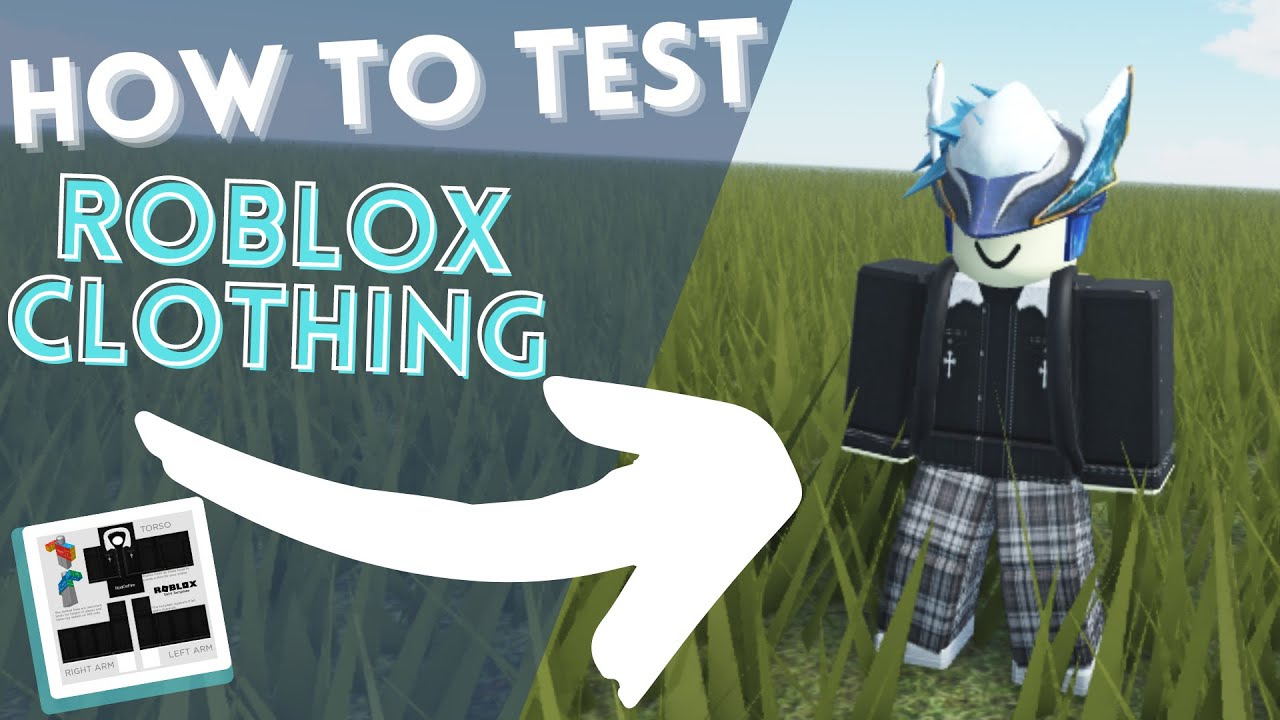
Roblox shirt testing is the process of previewing your custom clothing designs on an avatar before officially uploading them to the marketplace. This allows you to check for errors in texture alignment and scaling without spending the 10 Robux upload fee. Most creators use specialized testing games or Roblox Studio to view their designs for free using local files or decal IDs.
How do I test a shirt for free?
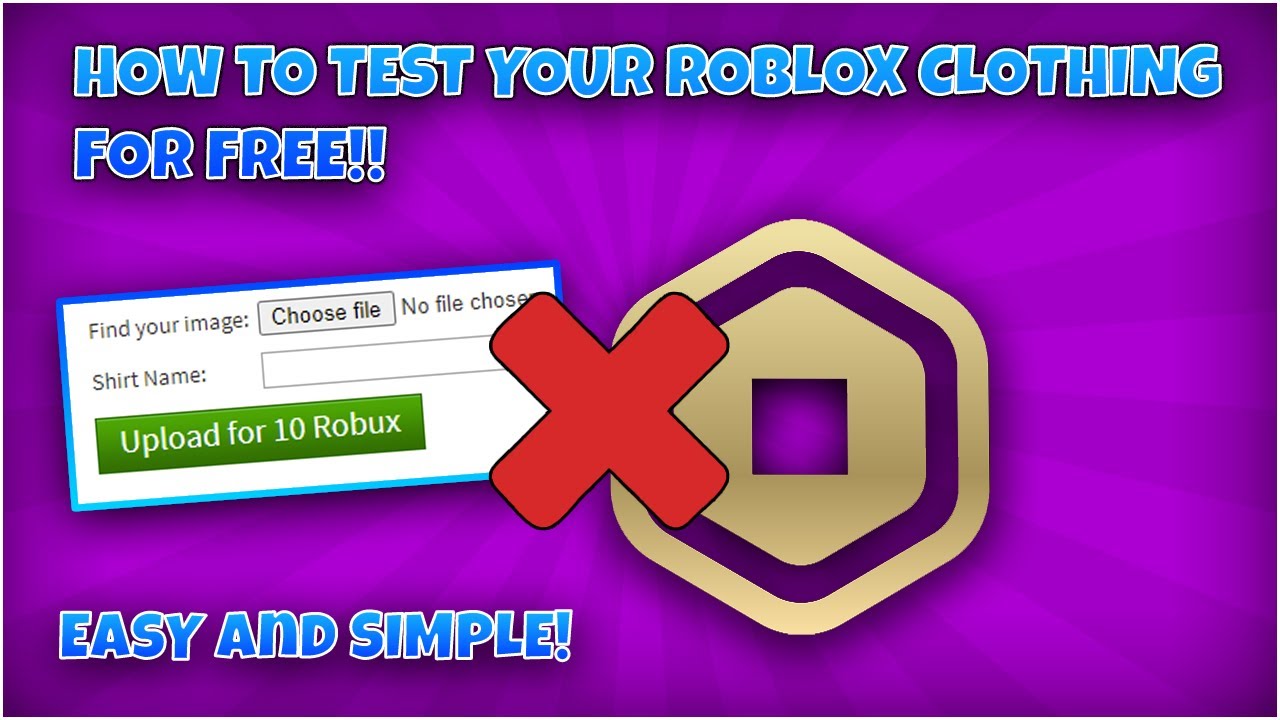
To test a shirt for free, you can use a public Shirt Testing game. Simply upload your design as a Decal in the Roblox Create dashboard, which costs nothing. Once uploaded, copy the numerical ID from the URL and paste it into the testing game's input box. This will apply the texture to your character so you can see it in real-time.
Tips & Tricks
How can I make my shirt designs look high quality?
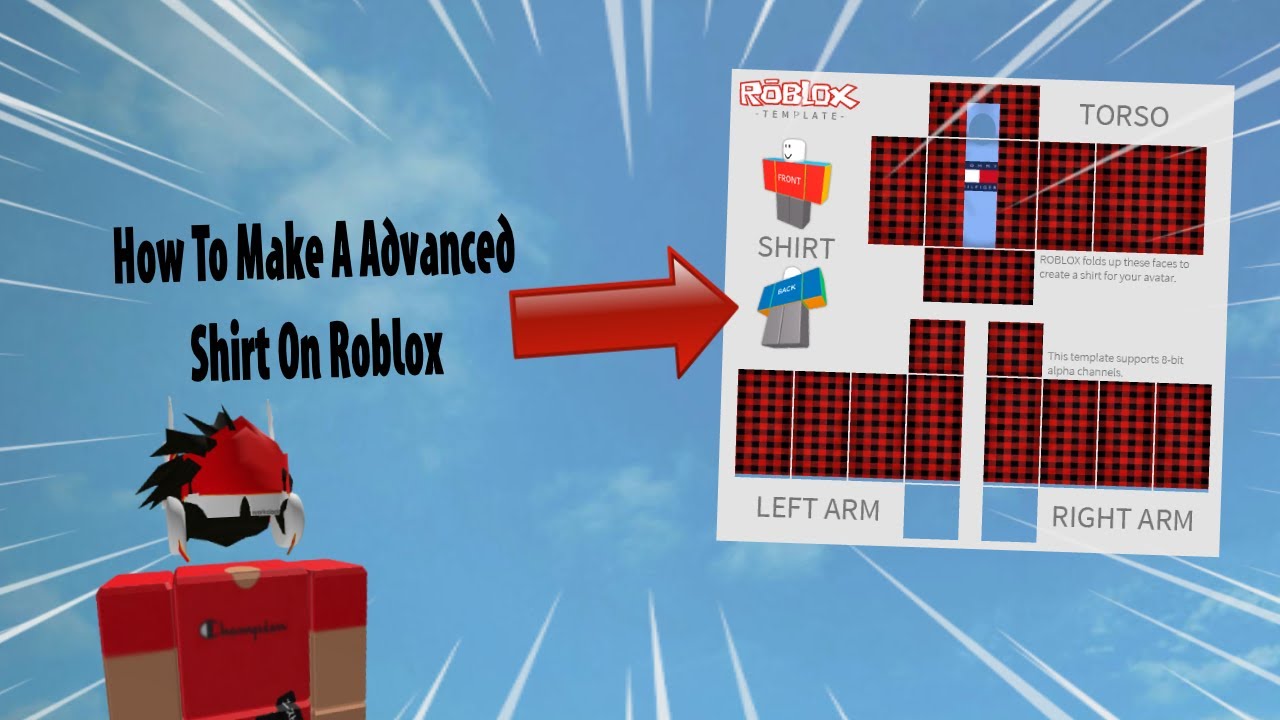
The best tip is to design your shirt at a higher resolution and then downscale it to the 585x559 template size. Use soft shading around the muscle areas of the template to give the clothing a 3D appearance. Always test your designs under different lighting conditions to ensure the colors do not look washed out or too dark during actual gameplay.
What is the most common mistake in shirt testing?
The most common mistake is failing to check the side and arm seams. Many designers only focus on the front of the shirt, leaving the sides look disconnected. Use a testing game with walking animations to see how the texture moves. If the lines do not meet perfectly at the joints, you need to adjust the pixel placement on your template.
Bugs & Fixes
Why is my shirt texture invisible when I test it?
If your texture is invisible, it usually means the ID you are using is for the Clothing asset rather than the Image asset. When you upload a decal, Roblox creates two IDs. You must use the Image ID found on the asset's page for it to show up in most testing scripts. Additionally, ensure your file is a transparent PNG rather than a solid JPEG.
Still have questions?
If you're still having trouble, check out the official Roblox Developer Hub or join a creator Discord like 'Roblox Designers' for real-time help. You can also view our guides on 'How to Sell Clothing' and 'Advanced Texturing Tips' to take your skills to the next level!
Have you ever spent hours perfecting a design only to find it looks completely broken on your avatar? This frustrating experience is why roblox shirt testing is the most critical skill for every aspiring digital fashion designer. How do I test my shirts for free before spending Robux on a permanent upload to the marketplace? Many creators find themselves asking this question because the upload fee can quickly drain your precious digital currency. Testing allows you to verify that your textures align perfectly across the character torso and arms during movement. You can ensure that your artistic vision matches the technical requirements of the platform without any financial risk involved.Why Professional Designers Prioritize Testing Environments
The Roblox avatar system uses complex mapping that can stretch your beautiful art in many unexpected and strange ways. Testing your designs in a live environment helps you identify these stretching issues before your customers ever see them. If you skip this step, you might end up with shirts that have visible gaps at the shoulder seams. These small errors can significantly reduce your sales and damage your professional reputation as a top-tier clothing creator. Using a testing game allows you to see how your design reacts to different lighting conditions and environment effects. You will quickly learn how colors shift from the bright sunlight of a baseplate to darker indoor game settings. Professional creators use these tools to ensure their clothing looks high-quality regardless of the game their customers play.
The Best Methods for Roblox Shirt Testing in 2024
There are several ways to verify your designs, but using a dedicated shirt testing game is the most popular. These games allow you to paste your local image ID directly onto a character model for an instant preview. This method is completely free and provides a realistic view of how the shirt fits on different body types. Another advanced method involves using Roblox Studio to create a local character with your custom shirt texture applied. This gives you full control over the camera and lighting to inspect every single pixel of your new creation. You can also test your designs on both R6 and R15 avatar rigs to ensure maximum compatibility for users. Many players still prefer the classic R6 look, so your designs must look great on both versions to succeed.
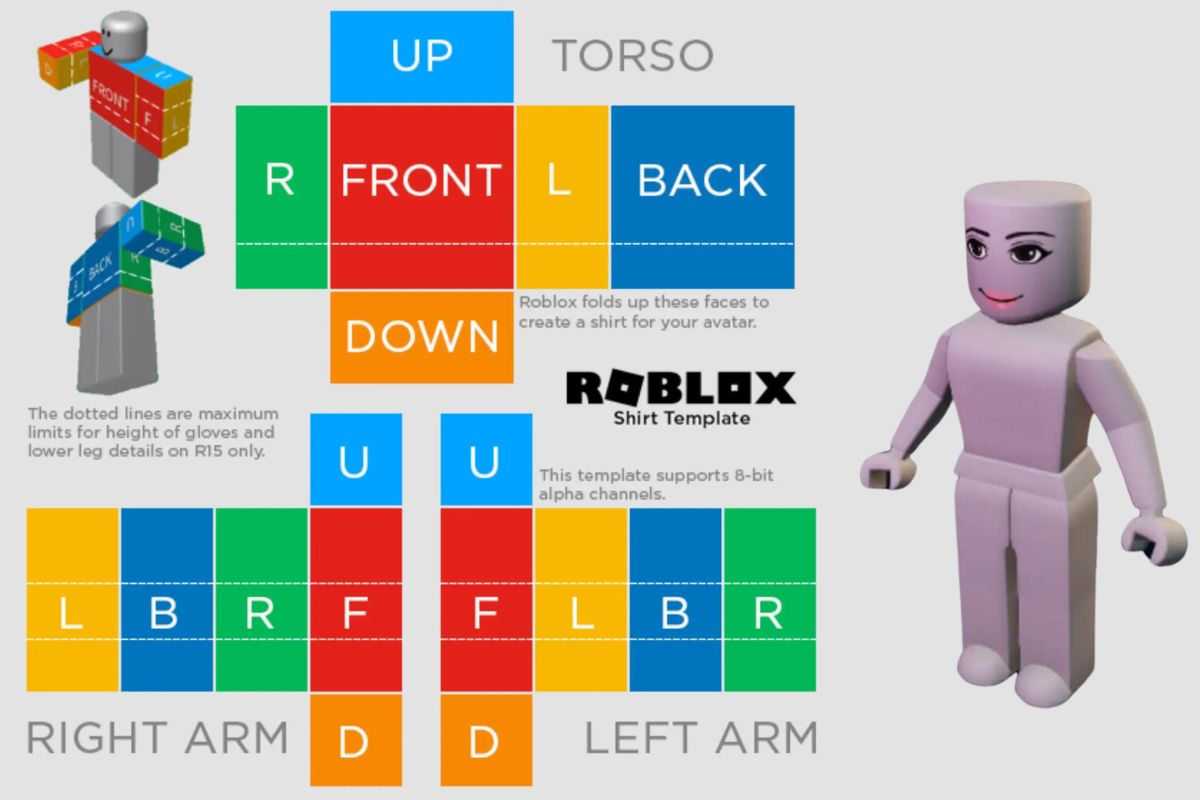
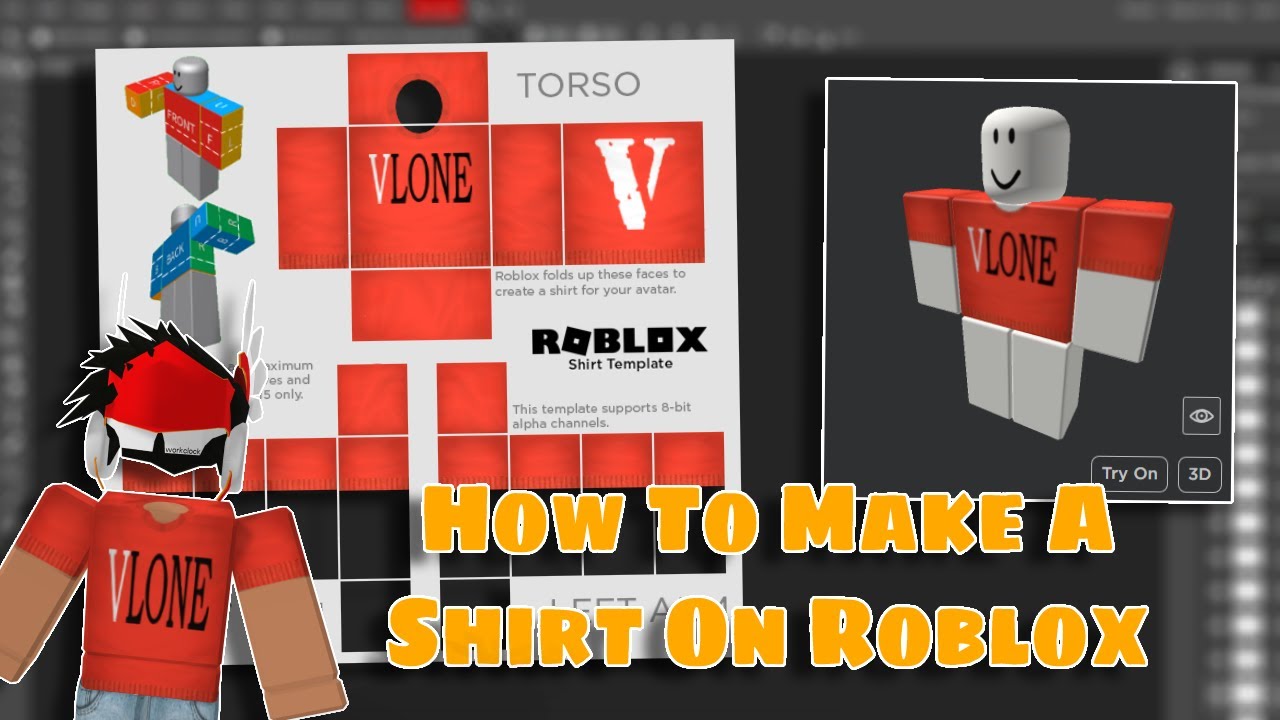
- Use the official Roblox shirt template to ensure your dimensions are exactly 585 by 559 pixels for clarity.
- Test your shirts with different skin tones to ensure the transparency and edges look natural for all players.
- Check the back of the shirt specifically to ensure the design elements connect smoothly across the spine area.
- Invite a friend to the testing game to see how the design looks from a third-person perspective.
Beginner / Core Concepts
1. **Q:** How do I start testing my first shirt design without spending any of my Robux?
**A:** I totally understand why you want to save your Robux because those upload fees really add up fast. The best way is to join a shirt testing game where you can input your design ID for free. These games create a temporary preview that only you and other players in that specific server can see. It is a fantastic way to check if your buttons and logos are positioned correctly on the chest. You should always keep your image editor open while you do this so you can make quick changes. You are doing a great job by being careful with your resources as you start your journey. You have got this!
2. **Q:** Where do I find my image ID if I have not uploaded the shirt to Roblox yet?
**A:** This one used to trip me up too when I was first learning the ropes of the platform. You actually need to upload your image as a Decal first to get a temporary ID for testing. Decals are free to upload and provide you with a numerical ID located in the browser URL link. You can use this ID in most testing games to see your shirt texture on a character model. Just remember that the decal ID is different from the final clothing asset ID you will get later. It is a smart shortcut that most pro designers use every single day of their creative lives. Try this tomorrow and let me know how it goes!
3. **Q:** Why does my shirt look so blurry even though I used a very high resolution image?
**A:** I get why this confuses so many people because we all want our designs to look sharp and crisp. Roblox automatically scales every shirt texture down to exactly 585 by 559 pixels regardless of your original file size. If your original image is too large, the downscaling process can make the details look fuzzy or pixelated. To fix this, try to design your artwork directly on the standard template size for the best possible results. This ensures that every pixel you place is exactly where it needs to be on the final avatar model. Keep practicing with the standard template and you will see a huge improvement in your design quality!
4. **Q:** What is the difference between testing on an R6 rig versus an R15 avatar rig?
**A:** This is a great question because the two rigs handle textures in very different and unique ways. The R6 rig is the classic blocky style and it does not bend the textures at the joints much. However, the R15 rig has many more moving parts that can cause your design to stretch or overlap oddly. Testing on both ensures that no matter what avatar your customer uses, your shirt will look absolutely amazing. Most testing games allow you to switch between these rigs with a single click of a button. It is a small extra step that makes a massive difference in the quality of your final product. You are becoming a real pro at this!
Intermediate / Practical & Production
5. **Q:** How can I check if my shirt seams line up perfectly on the arms and sides?
**A:** Getting the seams to match up is one of the hardest parts of being a clothing creator. I suggest using a testing game that features a walk and run animation cycle for your avatar. As the character moves, you can see if the texture on the torso matches the texture on the arms. If there is a visible break in the pattern, you need to adjust the pixels on your template. It takes a bit of trial and error to get it perfect, but the results are worth it. Professional designers spend a lot of time on this specific step to ensure a high-quality finished look. You are definitely on the right track by focusing on these important small details!
6. **Q:** Can I test how my shirt looks with different types of layered clothing or accessories?
**A:** This is a brilliant idea because most players wear many items at the same time on their characters. Some advanced testing games allow you to equip hats, hair, and even 3D jackets over your custom shirt. This helps you see if your design is hidden or if it complements the most popular accessories today. It is really helpful to ensure your main logo is not covered up by a standard necklace or scarf. Testing these combinations helps you design clothes that people will actually want to wear with their existing outfits. Experiment with a few different accessory combos and see what looks the best to you. You are doing great!
7. **Q:** Is it possible to test shirts using the Roblox Studio application instead of a game?
**A:** Yes, and honestly, using Roblox Studio is the gold standard for many of the top clothing designers. You can create a local file and apply it to a Dummy character without ever touching the internet. This method is incredibly fast because you do not have to wait for any web pages to load. You can see your changes in real-time as you save your image file in your favorite editor. It gives you the best lighting tools to see how your fabrics will look in different game environments. It might seem a bit technical at first, but you will love the speed it provides. Give it a shot today!
8. **Q:** What should I do if my shirt colors look different in the game than they did?
**A:** I used to find this so frustrating until I learned about how the Roblox engine handles lighting. The engine adds its own shadows and highlights which can make your colors appear darker or more washed out. I recommend testing your designs in a few different lighting presets within your chosen shirt testing game. This allows you to adjust the saturation and brightness of your original file to find a perfect balance. Most creators find that making the colors slightly more vibrant helps them pop in the game world. It is all about finding that sweet spot that looks good everywhere in the Roblox universe. You are making awesome progress!
9. **Q:** How do I ensure my shirt design does not get flagged by the moderation team?
**A:** Moderation is a serious topic and testing your design visually can actually help you stay safe. While testing, look for any symbols or text that might be misinterpreted by the automated moderation systems. Ensure that your design does not include any restricted content or misleading imagery that could cause an upload strike. Testing gives you a final chance to look at your work and ensure it meets community standards. It is always better to be safe and double-check your work before clicking that final upload button. Your commitment to following the rules will help you build a long and successful design career. Keep up the good work!
10. **Q:** Can I test how my shirt looks on different body scales and width settings?
**A:** Absolutely, and this is very important because Roblox users come in all shapes and various sizes. Many testing games have sliders that let you change your character height, width, and overall body proportions. You want to make sure your logo does not look too stretched out on a wider avatar. Likewise, you should check that the design does not look too squished on a very thin character model. Checking these variations ensures that your shirt is a versatile product that appeals to every single player. It is a sign of a truly thoughtful designer to consider all these different body types. You have got a great eye for detail!
Advanced / Research & Frontier
11. **Q:** How do I use the new Avatar Editor Service to create a custom testing tool?
**A:** This is getting into the really cool technical side of things and I love your curiosity. The Avatar Editor Service allows you to write scripts that can swap textures on an avatar dynamically. You can build your own private testing place where you can quickly cycle through dozens of designs. This is much more efficient than using public games if you have a very high volume of work. It requires a little bit of Lua scripting knowledge, but there are many great tutorials available. Creating your own tools is a huge step toward becoming a professional-level developer on the platform. I am so excited to see what you build with these powerful new features!
12. **Q:** What is the best way to test the metallic or shiny properties of a shirt?
**A:** This is a more advanced technique that involves understanding how the Roblox engine handles material properties. While shirts are mostly flat textures, you can simulate shine by using clever shading and highlight techniques. Testing this requires a game with a moving light source so you can see how the fake reflections move. You want to ensure the highlights look natural as the character turns around in the game world. It takes a lot of artistic skill to pull off a convincing metallic look on a 2D template. Keep experimenting with different brush settings and gradients to find the look that works for you. You are pushing the boundaries of what is possible!
13. **Q:** How can I test my designs for compatibility with the latest Layered Clothing updates?
**A:** Layered Clothing is the future of the platform and it is so smart of you to focus on this. You need to check how your classic shirt fits under various 3D coats and over different pants. Some 3D items might clip through your shirt if the design is too bulky or uses certain colors. Testing these interactions ensures that your shirt remains a core part of a player's outfit even with layers. You can find specialized places that have the latest 3D assets loaded for you to try on. Staying ahead of these technical trends is what will set your shop apart from the competition. You are doing an amazing job staying current with these updates!
14. **Q:** Can I automate the testing process using external software or plugins for Roblox?
**A:** There are some amazing community-made plugins for Roblox Studio that can automate the preview process for you. These plugins can take your saved image file and immediately update a model in your 3D workspace. This eliminates the need to manually upload or move files around during your creative design sessions. It saves a significant amount of time, especially when you are fine-tuning small details like pocket placement. Just make sure to only download plugins from trusted creators with high ratings in the marketplace. Using tools like these shows that you are serious about optimizing your professional workflow. You are definitely working smarter, not just harder!
15. **Q:** How do I test if my shirt design will be popular or trend in the marketplace?
**A:** While technical testing is vital, social testing is the key to making big sales in the community. I recommend sharing your testing screenshots in design-focused Discord servers or on social media platforms. Ask for honest feedback from other creators and potential customers about the colors and style. This allows you to make changes based on what people actually want to buy before you publish. It is a form of market research that can save you a lot of time and effort in the long run. Building a community around your work is the best way to ensure long-term success as a designer. You are going to be a superstar in the Roblox fashion world!
Quick Human-Friendly Cheat-Sheet for This Topic
- Always use the official 585x559 template to keep your designs looking sharp and professional.
- Test on both R6 and R15 rigs to make sure every player can wear your shirt perfectly.
- Upload as a free Decal first to get a testing ID and save your precious Robux.
- Check your seams while the character is moving to catch any stretching or alignment bugs.
- Look at your design in different lighting to ensure the colors stay vibrant and clear.
- Ask for feedback from friends before the final upload to catch any small mistakes.
- Have fun with the process and don't be afraid to experiment with bold new styles!
Maximize your Robux efficiency by testing shirts for free in dedicated games. Master the 585x559 pixel template to avoid blurry textures on your avatar models. Use Roblox Studio local file testing to preview designs without any upload costs or delays. Ensure your shirt seams line up perfectly for complex R15 animations and layered clothing styles. Join design communities to get feedback and discover the latest trending clothing testing game environments.
35


How To Test Roblox Clothing Before Uploading 2026 Roblox Tutorial . HOW TO TEST ROBLOX CLOTHING BEFORE UPLOADING ALL PLATFORMS YouTube . How To TEST Roblox Clothing BEFORE Uploading YouTube . How To Test Your Roblox Shirts And Pants Easy YouTube Hqdefault . HOW TO TEST ROBLOX CLOTHING BEFORE UPLOADING ALL PLATFORMS YouTube


Roblox Shirt Template Your Guide To Custom Apparel Design A Roblox T Shirt Design Template Shown In The Image . Roblox Shirt Template Tester Printable Calendars AT A GLANCE Templatye1 . Test Shirt Roblox NoFilter. Roblox Shirt Test Your Guide To Getting It Right . How To Test Your Roblox Clothes Before Sharing Them 5 Ways V4 460px Test Roblox Clothes Step 22 Version 3


How To TEST Roblox Clothing On MOBILE Before Uploading YouTube . HOW TO TEST ROBLOX CLOTHING BEFORE UPLOADING YouTube . Free Cool Roblox Shirt Template To Edit Online Transparent Roblox Shirt Template Edit Online . How To Test Your Roblox Clothes Before Sharing Them 5 Ways V4 460px Test Roblox Clothes Step 9 Version 3 . How To Make A Advanced Shirt On Roblox 2026 YouTube


How To Make A T Shirt In Roblox Mobile In 2026 YouTube Hqdefault . Unlocking The Y Shirt On Roblox What Makes It Trendy In 2026 Cool Roblox Shirt Template Edit Online . Roblox T Shirt Template . Free AI Roblox Shirt Generator Create Roblox Shirt Designs Online No Simple Camouflage Roblox Shirt Template Edit Online . How To Make A Easy Simple Shirt On Roblox 2026 YouTube


YouTube . Test Shirt Roblox 180DAY. Roblox Shirt Tester Create Stunning Custom Shirts Easily Today Roblox Shirt Tester.webp. How To Make A Shirt On Roblox 2026 YouTube . How To Test Your Roblox Clothing Before Uploading It 2023 Method


How To Test Your Roblox Clothes Before Sharing Them 5 Ways V4 460px Test Roblox Clothes Step 10 Version 3 . How To Tests Roblox Shirts Step By Step Guide Roblox Shirt Tester 2 . How To Test Your Roblox Clothing For Free Easy And Simple 2026 YouTube . Test Classic Clothing Roblox Creator Hub Block Avatar Dressed . How To Make A Shirt In Roblox A Guide To Designing


How To Tests Roblox Shirts Step By Step Guide Roblox Shirt Tester 2 100x58 . Dress To Impress Preview Your Roblox Shirt Like A Pro . Roblox Shirt Test Your Guide To Getting It Right Roblox Classic T Shirt IDs . HOW TO TEST CLOTHING BEFORE UPLOADING ONTO ROBLOX YouTube . Test Your ROBLOX Templates Before Uploading Clothing Tester YouTube